Taylored Life

To keep people informed of what the family has been up to...

JDT Birthday TickerAMT Birthday Ticker

Wednesday, January 27, 2010

Night, Night

On January 9th we transitioned Jackson to a big boy bed! We put his matress on the floor and started with his nap. He got up and cried at the door for a few minutes before I went upstairs and talked to him about staying in his bed. Then we read a book and tried again. This time it was a success. We know he got out of the bed because he had a book with him when he woke up. Since then, there have been no signs of him getting out of his bed after we say, "night, night". He doesn't even get out of the bed when he wakes up. He just talks (sometimes cries a little) until we come in the room. Then he sits up, hugs his bear, and climbs out. It's adorable.

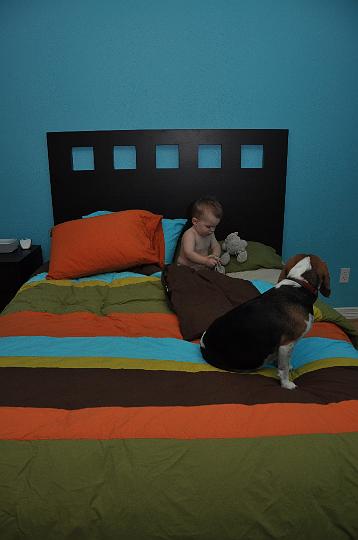
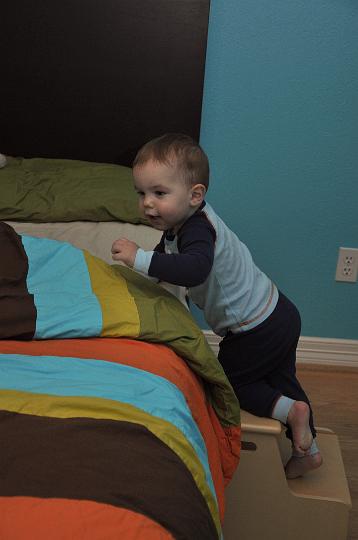
Today we had some new furniture delivered, which included a headboard and bed frame for Jackson's room. I put a little step stool by the side of the bed, and introduced him to everything when he got home. He LOVED it! He spent quite a while climbing up and down the step stool and crawling around the bed. After dinner, we went upstairs for our usual bath time routine, but when he saw the bed again, he was ready to play. I managed to get a couple of pics of him playing before his bath. I was a little worried he wouldn't want to stay in the bed tonight, but so far so good! He climbed right in after reading a couple of books and saying his prayers, and he said, "night, night".

Jackson in his big boy bed!Jackson in his big boy bed!Jackson in his big boy bed!Jackson in his big boy bed!

More pics in the album as always!

Labels: ,

Tuesday, June 10, 2008

Baby Room Woodworking

First, a quick update...we are still waiting for Jackson to decide he is ready to come. As E said last week, labor will be induced on Thursday unless he decides to come before then. However, E has gotten sick with a stomach bug that has been going around. She checked with the doctor and they may delay the induction if she still isn't feeling well tomorrow. I guess we'll see what happens...

While we wait, I figured I'd talk a little about the woodworking in the baby room. Elizabeth posted pictures last week so have a look at that (because I don't feel like posting more right now - sorry). The dresser was a fun project and it turned out pretty good. I talked about the plan a while back and have posted one update. The project went pretty smoothly because of my experience with the desk. It is a fairly simple MDF case on a stained birch base. The tolerances were pretty tight because of the overlay drawers but it worked out pretty well. The one new experience is that I got a paint/stain sprayer to try to make finishing easier. It worked really well and I am happy with it. The biggest problem with the dresser is that I didn't realize the "clear" polyurethane actually has a bit of a yellow tint. You can't really tell in the pictures but it is noticeable in person. I guess I could sand it down but I don't think it is worth it.

I'm really happy with the wall art...it is just three pieces of MDF glued and screwed together. I got a circle jig for my router that made the circles pretty easy. After setting it up and cutting, they just needed a little sanding to fix the irregularities. They are hung with my standard keyholes. This particular project made me really feel like a woodworker because I had the required materials laying around and didn't have to go buy anything. I'm not sure that will happen very often though since I usually take on big projects.

Labels: , , , , , , ,

Monday, March 31, 2008

Dresser Progress

I've been making some pretty good progress on the dresser for Jackson's room. Yesterday, I started painting. The drawers still need to be made but it is probably going to be ready pretty soon if I can find some time to work on it. Below is a picture of the base just before glue-up. I'll try to get some more pictures up soon.

dresser base

Labels: , , , ,

Tuesday, March 11, 2008

Jackson's Room Coming Together

Jackson's room is starting to come together! Since Elizabeth painted the room, we have gotten old furniture out and some new furniture in. We got the crib and glider. The picture below shows the current state of the room (it's a panorama so it may look a little off).

Jackson's room

In addition, E has designed and I have modeled the two pieces of furniture that I intend to build. I'm going to start on the dresser pretty soon and if it goes well and we decide there is enough room, I'll then make the book shelf.

dresser designbookshelf design

Labels: , , ,

1 Comments:

Blogger Brandon & Jenny Deitz said...

SERIOUSLY! How cute is that room?! Really - will you decorate every room that I ever occupy??

March 12, 2008 3:13 PM  

Post a Comment

Hide Comments

Wednesday, February 13, 2008

Finished Bed Side Tables/Lamps/Headboard

Today, I completed the bed side tables for our bedroom (previous post), hung them on the wall, and wired up the integrated lamps. I know it sounds a little strange, but it is all part of the headboard design that Elizabeth came up with. This post has a lot of implementation details on the bed side tables. Also, the picture includes the photographs that we hung some time ago but haven't posted a picture of until now.

Completed Headboard

Labels: , , ,

1 Comments:

Anonymous janet said...

Hey, that's cool!

June 7, 2008 5:41 PM  

Post a Comment

Hide Comments

Tuesday, February 12, 2008

Stain and Polyurethane

This morning, I put the last coat of polyurethane on the bed side tables. I have to say that staining and applying polyurethane are among my least favorite activities. Anyway, I decided to finish the wood before assembling, so I taped off the areas that will get glue and I'll be putting everything together tomorrow. Hopefully, I'll have pictures soon.

Labels: , , ,

Tuesday, January 29, 2008

Bed Side Tables

For the first time in six months, I've done some work on the headboard for our bedroom. I've been putting it off partially because of the complexity of what I am trying to do. If you aren't familiar, see this post which talks about the design and shows a drawing of the plan. Basically, I'm trying to create bed side tables with integrated lamps that hang on the wall as part of the headboard. Incidentally, we've added the pictures to the headboard but I haven't uploaded an image yet.

The tables are cantilevered from the vertical board but are about twice as wide as the vertical board so the joinery is not straightforward. The picture below shows the dry fit tables and a more detailed description of the work follows.

bedside tables

First, I created a simple jig to rout slots in the vertical boards.

Router JigRouted Slot

Next, a little chisel work squared off the slots and a dado blade on the table saw was used to shape the tables appropriately.

bedside table joinery

Adding some 5 inch triangles using biscuit joinery provides additional support for the tables.

table support

Finally, a little work on the back was done. A slot is run up the back for the power to the lamp. Also, two keyholes are just above the table mounting for attaching to the wall. The upper part will be attached with screws through the board hidden by the light fixture.

Wire slotmounting keyholes

Basically, all that is left is to sand, stain, and assemble. Hopefully, I'll have completed images pretty soon.

Labels: , , ,

Friday, January 25, 2008

Nursery Decorations

We've decided on some of the decorations for the nursery. If you haven't noticed our style is a little more modern, and the nursery will be no exception. Of course, it will still be geared towards a baby though. Ross is going to build a bookshelf and a dresser for the room, which I think will be so speacial. Here are pics of some of the other things that will be going in the room...

Brandee Danielle Modern Baby Boy Cafe BeddingOeuf Classic CribMonte Glider

Labels: ,

1 Comments:

Anonymous Wendy said...

I LOVE it!!!! That set is just adorable!!! I can't wait to see it all put together. :o)

I tried to join Bay Area Mom's...just waiting for my approval. :o) I hope that's okay with you.

January 25, 2008 10:28 PM  

Post a Comment

Hide Comments

Monday, January 14, 2008

Question: Bed Joinery

I got an email today from Kris in Bend, OR asking for clarification on how I hid the nuts used to assemble the bed I built.

platform bed

It's actually a fairly simple solution. I embedded square nuts in the inside frame by cutting snug fitting square holes with a chisel. While square nuts are not nearly as common as hex nuts, my local hardware store had a fairly wide selection for larger bolts like the bed bolts I used. So the decorative oak board would hold the square nuts in place when disassembled, I kept the square nuts fairly close to the surface and drilled shallow holes in the oak to receive the small amount of bolt that might protrude from the nuts. Of course, sizing the bolts and carefully cutting the t-slots was also very important. (To be completely honest, I assembled the inside frame before attaching the finished oak pieces and I haven't taken the bed apart since but my hope is that everything is snug enough that I won't have to take the oak off to get the bed back together.) As for the headboard...it goes against a wall, so that hardware was left exposed. Kris, I hope this helps.

platform bed joint

Labels: , ,

1 Comments:

Blogger Ross C. Taylor said...

I have recently disassembled and reassembled the bed with no issues!

December 7, 2009 2:09 PM  

Post a Comment

Hide Comments

Sunday, December 09, 2007

Desk Improvements

After using the desk I built for nearly a year now, I finally got tired of some little issues and fixed them today. From day 1, we had trouble with wire routing. This is mainly because I forgot to leave room for wires when making the sliding shelves. At the time, I rigged a solution by cutting slots for the wires in the shelves but they didn't leave much room for error so we were constantly wiggling wires to make the shelves close fully. Today, I finally fixed the problem. I simply cut a larger notch (1.5" x 5") in the back of each shelf to leave room for the wires. This was done with a simple template I made and a flush trim bit on my router. The first picture below shows an old notch and the template and the second picture shows the results. I can already tell I'm going to be much happier.

desk sliding shelf templatedesk sliding shelf update

Labels: , , ,

Sunday, September 23, 2007

Links to Projects Labels

I've been using the Blogger labels for a while now but since I'm moving my projects posts to this blog, I wanted to provide links to the labels on previous posts. That way, if you are looking for posts on a specific topic, you can click on the links below for the older posts.

Labels: , , , , , , , , , , , , ,