Projects

This is where I will talk about my various projects. This includes home improvement, woodworking, tayloredtruth.com, robotics, and more.

Wednesday, July 04, 2007

Headboard Progress

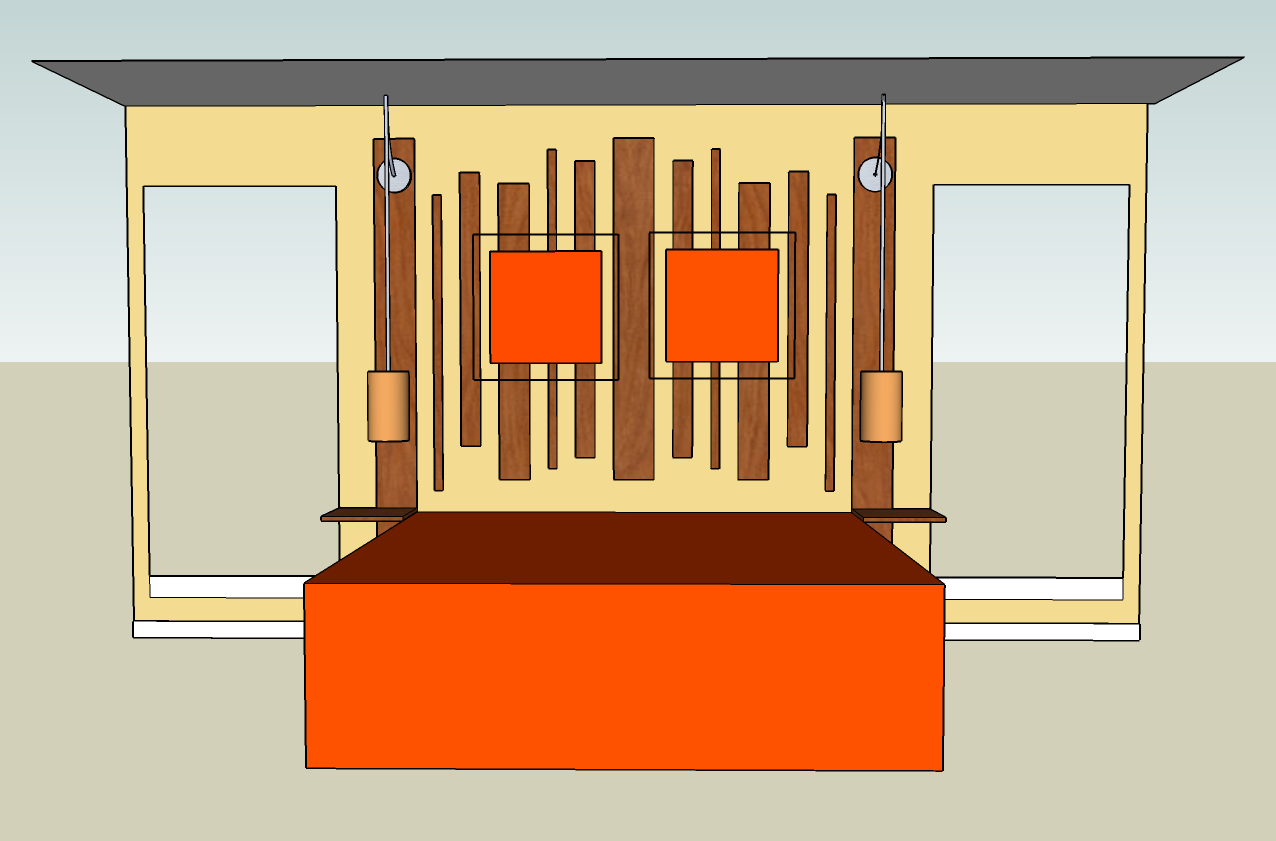
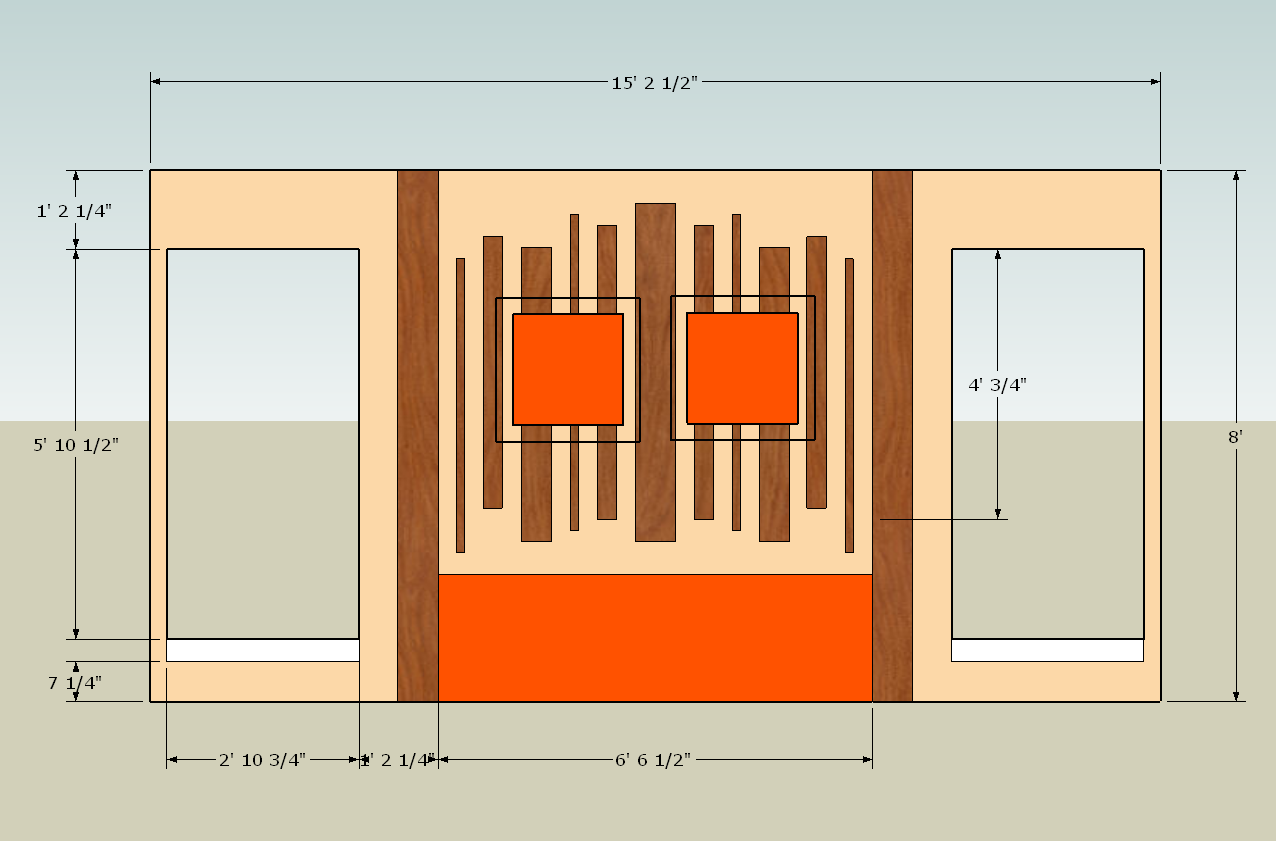
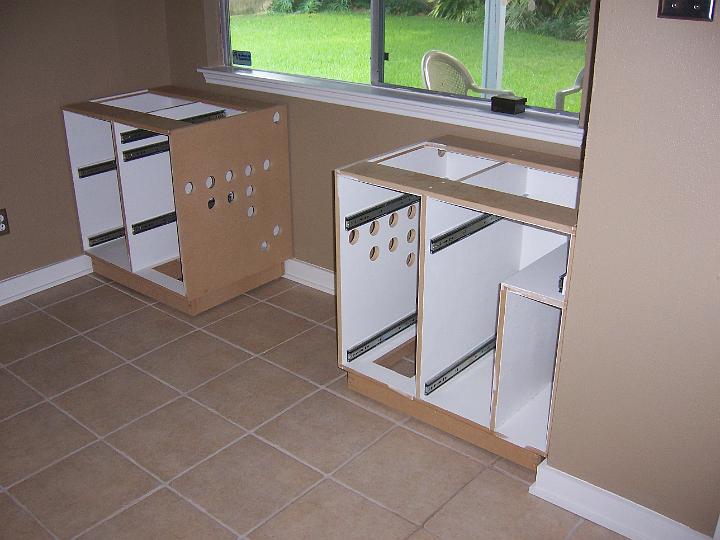
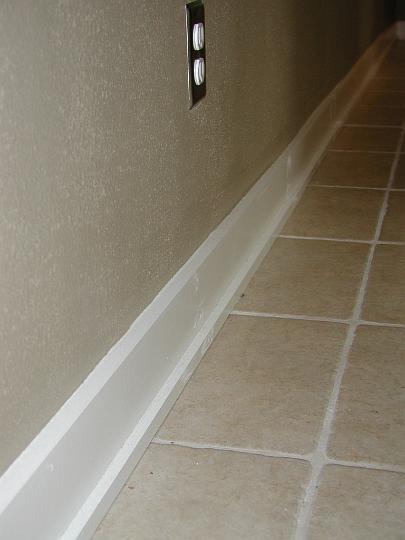
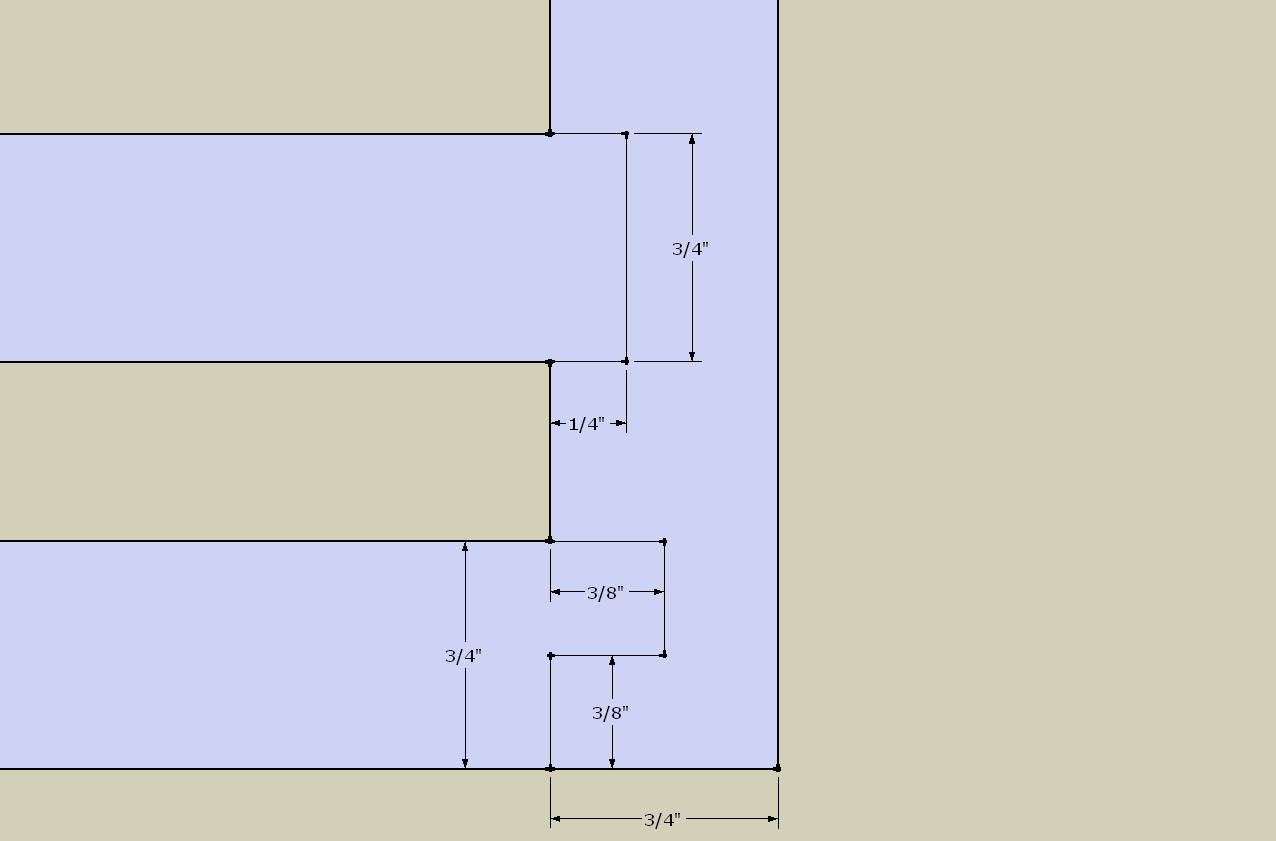
I haven't made any progress on the headboard in close to a month. The combination of rain and other activities has really slowed me down. I hoped to work on it today but I'm not sure I will because of the rain again. It's not that I can't work in the rain, but it isn't particularly pleasant. Anyway, I thought I'd put out a brief update on what I've got so far. I updated the design slightly to avoid the baseboards and to allow us to add crown molding later if we want. I also made my plans more detailed as you can see in the picture.

headboard sketch

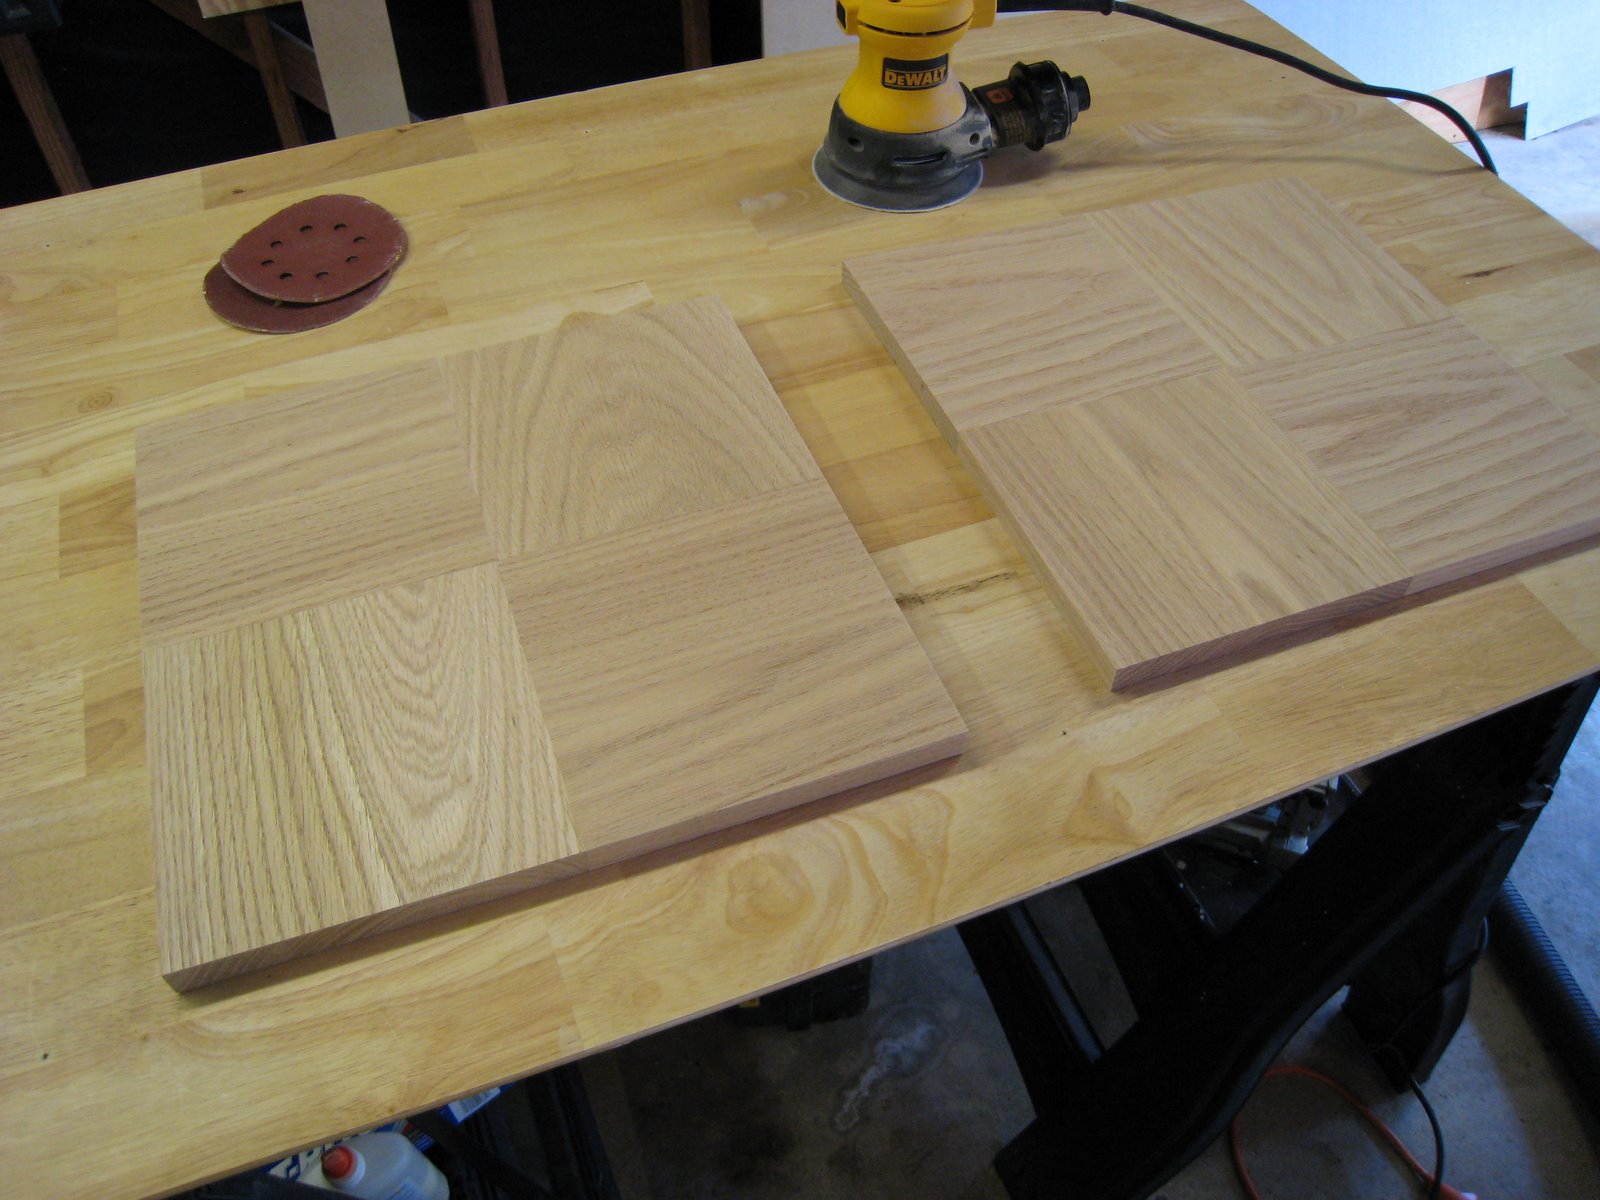
The previous picture didn't even show the tables which I have completed building. They are 14 inch squares made from four pieces of oak. Just for these little pieces, I used a planer, miter saw, jointer, biscuit joiner, and sander. They turned out looking great; I just have to figure out how to attach them now.

bedside tables

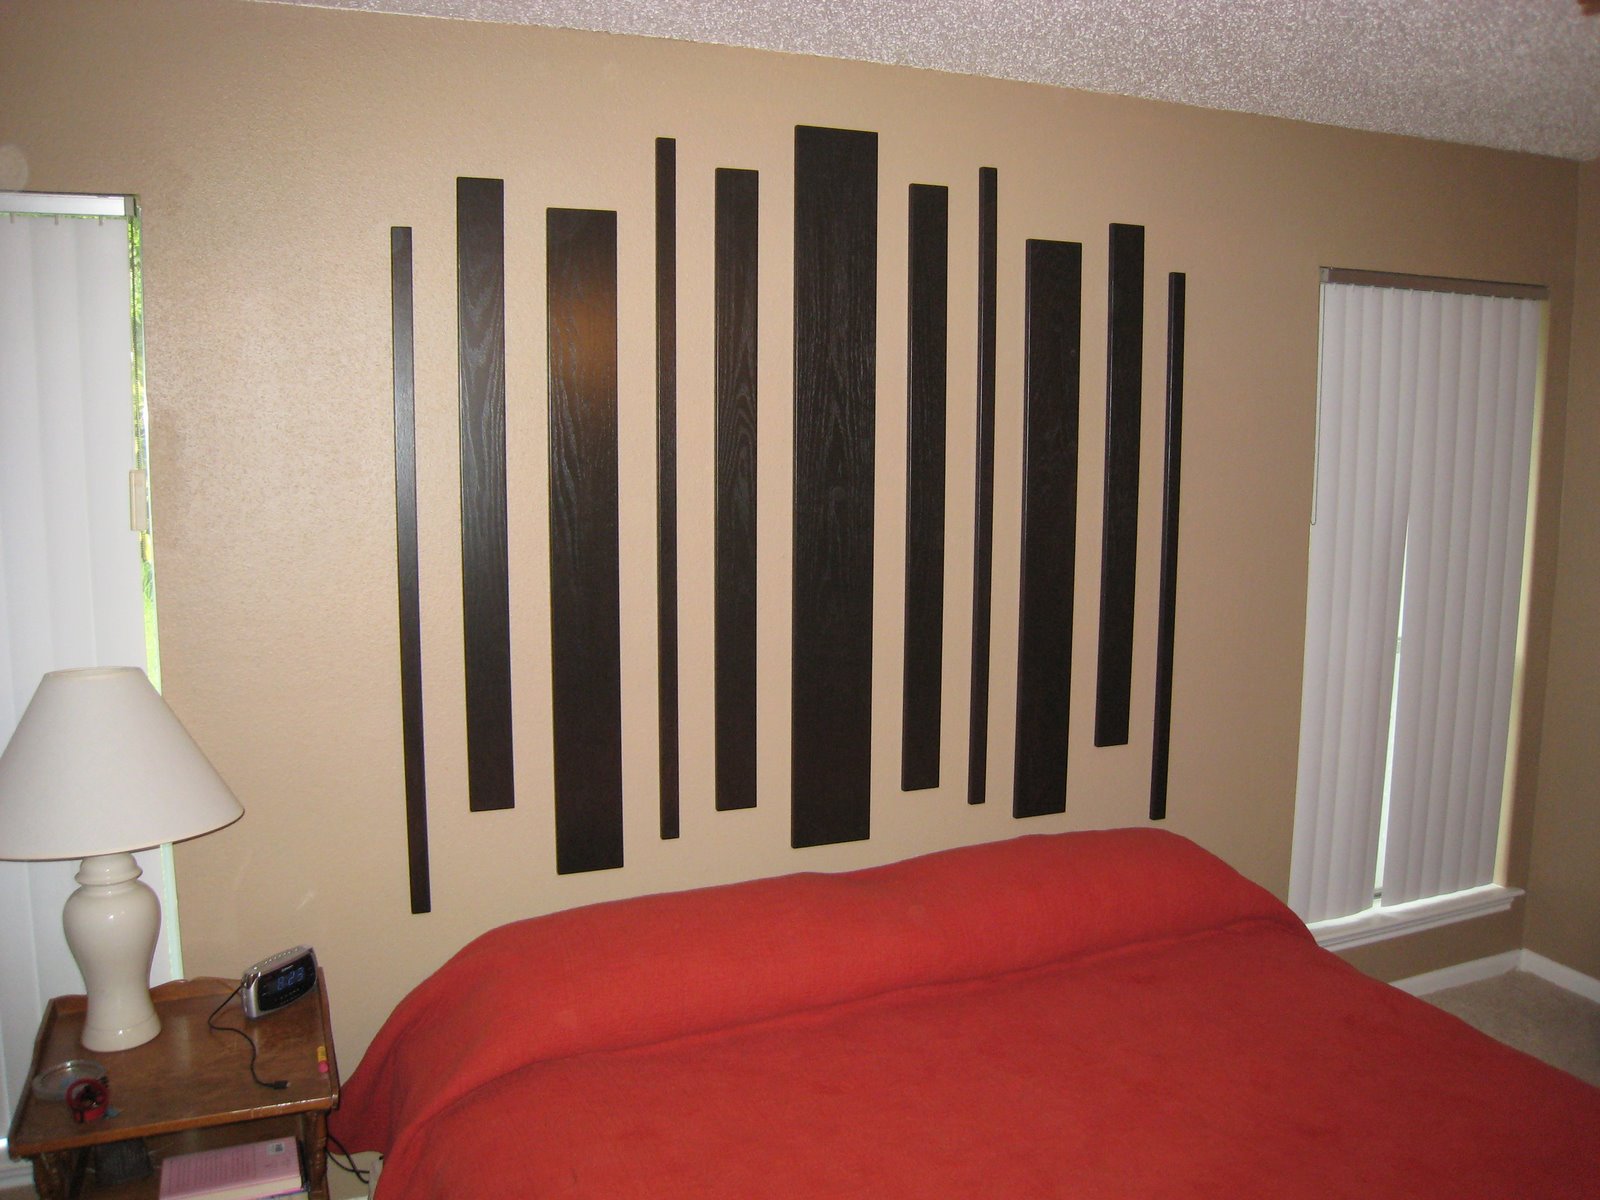
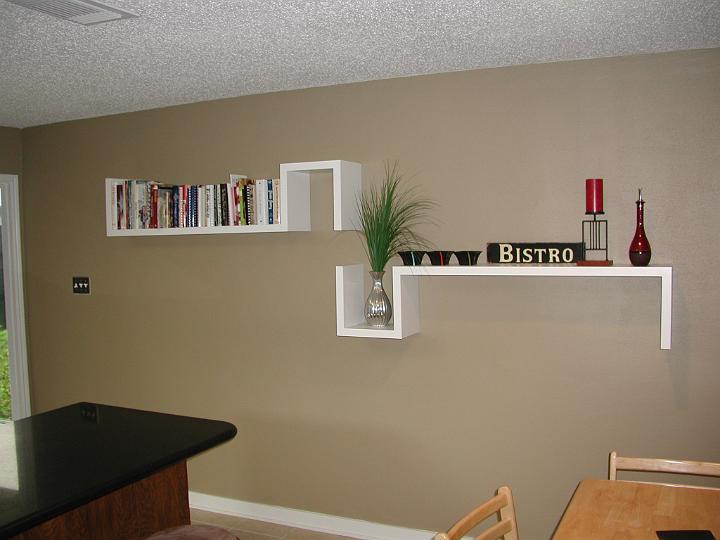
And last but not least, I've already put up most of the boards. Compared to the two that are left, these were fairly easy but it did take some time to get them up there straight and evenly spaced. I used keyholes in the backs of the boards placed so that I just needed to get two level rows of screws in the wall with the correct spacing. It took some time and diligence but worked perfectly.

most of headboard

Labels: , , ,

Sunday, April 01, 2007

More Garage Lighting and Upcoming Projects

E and I have decided that our next big project will be the "headboard" for our bed. I put that in quotes because it isn't exactly a headboard but I can't think of a better description either. It's actually more like wall art over and around the bed. Confused yet? The picture below is a rough sketchup of the design.

Bedroom headboard design

There are actually a few details missing. There will be small tables on each side of the bed cantilevered out from the boards there and some pendant lights that hang down above the tables. Again, hard to explain but we hope to have it done soon so I should be able to put up some pictures. I've already got the middle boards ready to be stained. I cut keyholes in them for hidden mounting to the wall.

The reference to more garage lighting is that I installed two more lights in the garage like the others. I wired them to the existing switch so I can get some pretty good light in there. The motivation was that we are in a pretty rainy season but there wasn't enough light to stain wood with the garage door closed. There is plenty of light now!

The other "upcoming project" I'm actually just about to go do. Because of tree roots, there are some steps in our sidewalk and the community association has been complaining. There is a whole frustrating story there because the steps in our sidewalk are nothing like some of the others around the neighborhood. We figure that someone on the board must live on our street. Anyway, I bought some concrete and I'm going to try to build "ramps" like the association requested. We'll see how it goes.

Labels: , , , ,

Monday, February 26, 2007

Lighting Projects

outdoor light fixture

Over the last couple of weeks, I've done three lighting projects. First, we had these really ugly outdoor lights on the back patio that we wanted to replace but hadn't gotten around to yet. One of the bulbs burned out so that was our motivation to take care of it. Sorry I don't have any before pictures but I've included an after picture. Not that it is particularly exciting, but there is also a picture of the other one in the album.

old chandelier

The second project was a little more involved. E got a new dining room chandelier for Christmas to replace the beautiful thing you see on the left (in mid-removal). Of course, it wasn't as simple as just replacing the existing one; it had to be moved as well so I started by patching the existing hole. This is the first time I've done this before so I'm pretty happy with the results. If you look closely, you can tell where it was but it certainly doesn't stand out. Anyway, I used this real popcorn ceiling stuff that came in a tube and just had to carefully apply it to get a similar texture to the rest of the ceiling. Next, I moved the ceiling box and cut a new hole for the new chandelier. Here are a couple pictures of the finished job.

new chandeliernew chandelier in room

The last project was simply replacing the light over my workbench in the garage with a couple of new lights. The old one was broken and only occasionally worked. It's nice to actually be able to see out there now. Here are the before and after pictures.

old garage lightnew garage light

I'm actually planning to do a little more lighting work coming up. I am probably going to put another one of the outside lights under the patio and I've got a couple more lights for the garage. Both of those projects require running wire though so I might not get to them right away.

Labels: , , , ,

Sunday, February 18, 2007

Computer Desk: Part VI - Finally!

The computer desk is done! Actually, it has been for a couple weeks but they have been a very hectic couple of weeks for E and I. I went to Washington, DC last week for work and E joined me for the weekend. We've also been really busy at work. Anyway, that's why it has taken a while to get this entry published. We've completely moved into the desk now including computer, accessories and files. There's not really much to say about it except that we decided to go with glass for the durability. See the pictures below. Notice that all of the components can pull out. This is great for access but made cord running a real pain.

desk w/doors closeddesk w/doors open

Labels: , , ,

Thursday, January 11, 2007

Computer Desk: Part V - Finished?

desk with top

Well...not quite but it is starting to look like it. The top, doors, keyboard drawer, and baseboard have all been installed since the last time I posted a picture. The top hasn't actually been secured yet because we are going to take it and have glass or acrylic cut to fit to protect the top. I'm leaning toward acrylic because it will be easier to work with, can be really thin, and is cheap but it will depend on what the edge finishes look like. We are also going to be cutting at least one hole in the top for monitor cables. We have discussed cutting several holes to make it a design feature. The baseboard needs to be touched up where the nail holes are and I've still got a few more drawers to do but it is coming along.

Labels: , , ,

Tuesday, January 09, 2007

Computer Desk: Part IV - The Teaser

I worked on the desk a lot last weekend and E did some painting. We got the doors finished and the top is currently being painted. Sorry, I'm too lazy to go take pictures right now but I just wanted to let you know that progress is being made. I expect it to look finished by the end of the coming weekend. It still won't have some of the innards though.

Labels: , , ,

Thursday, December 28, 2006

Computer Desk: Part III - Drawers

desk drawers

Elizabeth and I worked on the desk yesterday and will do a little more today. She started painting some of the sliding shelves that the components will sit on and the center section that will house the keyboard drawer. Once these are done and the center section is installed, I can work on the doors and then the top so it finally seems like I'm getting somewhere.

In the mean time, I built a couple of the drawers. I'm really happy with how they turned out. You can see how they look in the picture though they will actually go at the top instead of the bottom of the cabinet.

Labels: , , ,

Thursday, November 30, 2006

Computer Desk: Part II - 'Oops!'

Progress has been slow on the desk lately and I recently made it harder on myself. First, E has of course done her job of painting the bases and they look great. I've started working on the drawers, shelves, and the center section that will hide the keyboard behind a fake drawer. It took me a long time to decide how I wanted to do everything. I finally, built the center section though and E painted it and then I dropped it. Oops! Okay, I'll admit that the first word out of my mouth was not quite as polite as 'oops.' Anyway, I pretty much have to start over and am having difficulty finding the motivation to do work I've already done but at least the planning is done, right?

Labels: , , ,

Sunday, October 01, 2006

Computer Desk: Part I

So, I've mentioned this desk that I am building for the breakfast nook in the kitchen several times and I am finally going to fill in some details on the project. Since we moved in, we've had a table and chairs set in the breakfast nook, and it has been nice to have as an extra place to sit and eat. However, when we remodeled the kitchen and put in the new countertops, we added seating at the island so we can sit there and eat. This was partly because we wanted to get rid of the table and put a desk there instead. It is a nice spot for a desk because of the window plus moving the computer and accessories out of the third bedroom will free up that room for other purposes.

Since we are trying to store a lot of stuff in the desk, I am using the entire 95" width of the nook and I am going to make it a built-in. Actually, it will not be attached to the walls or anything so it could come out, but I am going to match the base molding and do a few other things to make it look like part of the house. We will probably leave it when we move and I want it to look good so that it adds value to the house.

desk in work

Anyway, here you see where I am at this point. Obviously, neither piece is actually finished because they need to be painted and I need to add the doors but you can get the idea. Each compartment has its purpose and it was all designed around the things we want to put in the desk (computer, printer, scanner, shredder, files, subwoofer, etc.). As always, there are a couple more pics in the house album.

This is all made from 3/4" MDF held together with glue and a few screws. I used the joinery shown in this picture (created in Google Sketchup). Both of these joints add structural stability and increase glue surface area. I got all the hardware including the drawer slides shown from Rockler.

The next step is to add the top. This should be pretty interesting because the walls are not square and aren't all that straight either so I'm going to try to make a piece fit. Then I have to build all of the drawers and the center piece which will be a faux drawer hiding a slide out keyboard. Stay tuned and I'll do my best to keep this up-to-date with my progress. Unfortunately, I probably won't work on it much for about 3 weeks so I doubt there will be any updates until then.

Labels: , , ,

Sunday, September 17, 2006

Kitchen Shelves

S wall shelves

What do you do with a really long blank wall in a kitchen? How about wall shelves. But not just any wall shelves...fancy, large, funky, creative, 'S' shaped wall shelves. Though not a completely original design, these shelves are yet another brilliantly functional and attractive design from my lovely wife.

As far as design, I think the pictures say all there is to say and, in fact, there is not that much to say about the implementation either. The shelves are made from glued up 3/4" MDF to produce a thickness of 1 1/2". The total length is 5ft and stud positioning was taken into account during design to guarantee plenty of support for the relative heft of that much MDF. These shelves are very secure due to the mounting method I chose. Basically, I created a copy of the shelves out of solid 1x2 wood and fastened the copy to the studs with screws. The shelf pieces were dadoed to fit over the 1x2 copy and a couple of screws through the top of the shelf attach them together.

This is all part of a master plan that will include some more decorative work on the wall and a wine rack. I'll be working on that after I finish the desk. Speaking of the desk, for the first time I will try to keep the blog up-to-date with progress instead of just giving updates upon completion so look forward to that.

Labels: , ,

Sunday, September 03, 2006

Kitchen Makeover: Part III

complete cooking area

It is easy to forget exactly how much work we have done in the kitchen until I start trying to document it all. We left off with the countertops having just been put in. After that, we had professional tile layers come in and put up the backsplash. We, also, added knobs and handles to the cabinetry and painted the walls in a tan color. With these changes, the cooking area of the kitchen was mostly complete.

Next, attention was focused on the long wall with the wayne's coat. We pulled the wayne's coat off but it had been attached with liquid nails so it tore up the drywall. After about a week of E and I both trying to fix the dry wall and match the existing texture, we finally gave up and had painters come in. They were smarter and smoothed the whole wall and then retextured instead of trying to match the existing texture.

baseboard

Lastly, we put in new baseboard. Because the tile had been installed after the wayne's coat, the baseboard had to be pretty thick to cover the gap. As you can see, we just used a very simple design. We also, put it under the cabinets and just the small piece of baseboard around the back side of the island. Putting it under the cabinets meant it needed to go in front of the dishwasher base. This is a problem because the dishwasher sticks out a little and because I didn't want to have to remove the baseboard to get to the dishwasher. I solved this by attaching a piece of baseboard to the dishwasher with magnets. It stands out a little , but is hardly noticeable in person.

That pretty much wraps up the major changes to the kitchen itself. There are a lot more pictures in the house album. I've since added some shelves to the long wall that I'll write about next and I am currently building a desk to go in the breakfast nook. There will be plenty of time to write about that because there is still much left to do.

Labels: , , , ,

Saturday, August 19, 2006

Kitchen Makeover: Part II

kitchen before

Elizabeth and I have done a lot of work on our kitchen. Like I said in Part I, we really didn't like the kitchen when we moved in so we started making changes immediately. However, there was some fairly significant design changes to make, so we started off slow (again, see Part I). I am now going to start talking about the major changes. Unfortunately, we did not document the work very well in pictures but at least you can see the results. As a reminder, I've put in a before pic.

undercabinet light

The first thing E and I did was refinish all of the cabinets, doors, and drawers. We wanted them to be darker than they were so we just did a light sanding job and then put a couple of coats of a darker stain on. Next, Elizabeth's dad, Kim, helped me to tear out the old countertops, all of the old tile, and the drywall that was behind the tile. He and I then reinforced some of the joinery in the wall with some 2x4 and installed some undercounter lighting that I rewired with appropriate wire so that I could run it through the wall and connect it to the existing switch for the sink light. Lastly, we installed tile backerboard for the new tile that would be installed.

E and I then had Silestone countertops put in along with a new sink, faucet, and cooktop we had purchased. Of course, I then had to figure out how to adjust the plumbing to work with the new sink layout and I had to hook the new cooktop up to the gas line that we had run. We also had a professional do the electric conversion from a hardwired 240V to a 120V plug for the new cooktop. Here are some pictures of the work and results and there are more in the House Album.

new sinkplumbing
new cooktopcooktop hookup
kitchen in work

Labels: , , ,

Wednesday, July 12, 2006

Kitchen Makeover: Part I

The only part of the house that Elizabeth really didn't like when we moved in was the kitchen. With the greens and whites, it definitely had a country feel (see before pictures below) and if you haven't been able to figure it out yet, our style is more contemporary. Anyway, I agreed that we could overhaul the kitchen and E set out designing. However, while she was deciding on a design, a few things had to change as a temporary fix.

before picture of breakfast nookbefore picture of kitchen

The most obvious change we made was the paint color. We painted most of the room a reddish orange color and the wayne's coating white. However, the more subtle changes actually make a big impact when your in the room.

after picture of breakfast nookafter picture of kitchen
As you can see, we took down the blinds and whatever you call that window covering and just left the windows open. We will probably put something back up eventually, but it actually isn't bad with nothing. I also replaced the lights over the sink and the kitchen table with recessed lighting. This was actually kind of fun because I got to use the reciprocating saw to cut the larger holes. I even had to cut out the old light fixture over the sink because I couldn't get to that part of the attic to remove the old mounting hardware.

The last two changes are that we painted the fluorescent light fixture and changed the plastic inserts. The surround was a natural wood color and the inserts were the standard textured type. The white makes it stand out less and we used inserts with a square pattern that is more contemporary looking. Lastly, we replaced the wall plates with brushed metal plates.

This is how our kitchen looked for a while before E finalized her designs and we made the big changes. I'll have details on those soon.

Labels: , ,

Sunday, July 02, 2006

Painting: Part 2

By February 2005, we completed three more painting projects. The kitchen will be shown in a later post, but I will show the other two here. I'll start with the guest bedroom; we basically just wanted to add some more color. Have a look at the before and after below.guest bedroom picture before paintingguest bedroom picture after painting
The other painting job was in the front of the house. If you recall from my first post, the front of the house was pretty bland with gray paint in the entry along with the gray brick. Elizabeth and I tried to make it stand out a little by painting the entry white, the door red, and the trim black as you can see in the following two pictures.picture of house frontpicture of front entry
I think it turned out pretty good. I'm not sure we will leave the black trim forever and the door really needs to be replaced but I know E likes the red color for the door. Also, I really should replace that light fixture and the door hardware, but that is for another day.

Labels: ,

Thursday, June 29, 2006

Painting

What's the first project that we undertook when we moved into the new house? Painting...and lot's of it. Most of the house was a neutral light tan color, so we wanted to add some color. We painted the living room / dining room, computer room, and master bedroom in the 3 days after we closed but before we moved our furniture. Below are a before and after of the fireplace in the living room (E also made the curtains shortly after we moved in).
living room picture before paintingliving room picture after paintingcomputer room picture before painting
The biggest change though was in the computer room where there was a mural that we painted over (see before image at right). We started with a bright yellow that ended up being too bright (sorry no pic) so shortly after we moved in, Elizabeth painstakingly taped and repainted to get the results you see in the two images below. Of course, she also recovered the futon which used to be a dingy white.
computer room picture after painting (1)computer room picture after painting (2)

Labels: ,

Thursday, June 22, 2006

New Home!

picture of our home
Okay, so it isn't all that new. In fact, E and I bought the house in September 2004. However, this is a new blog so I figured I might as well start from the beginning. I'm not going to talk about any projects right now but I wanted to introduce the house where most of the projects take place. If you want to cheat, you can check out a lot of my project results in the projects album.

Labels: